创建资源服务器
概述
在 为什么需要 oAuth2 和 RBAC 基于角色的权限控制 章节,我们介绍过资源的概念,简单点说就是需要被访问的业务数据或是静态资源文件都可以被称作资源。
为了让大家更好的理解资源服务器的概念,我们单独创建一个名为 spring-security-oauth2-resource 资源服务器的项目,该项目的主要目的就是对数据表的 CRUD 操作,而这些操作就是对资源的操作了。
操作流程

- 初始化资源服务器数据库
- POM 所需依赖同认证服务器
- 配置资源服务器
- 配置资源(Controller)
POM
<?xml version="1.0" encoding="UTF-8"?>
<project xmlns="http://maven.apache.org/POM/4.0.0" xmlns:xsi="http://www.w3.org/2001/XMLSchema-instance"
         xsi:schemaLocation="http://maven.apache.org/POM/4.0.0 http://maven.apache.org/xsd/maven-4.0.0.xsd">
    <modelVersion>4.0.0</modelVersion>

    <parent>
        <groupId>ml.yompc</groupId>
        <artifactId>hello-spring-security-oauth2</artifactId>
        <version>0.0.1-SNAPSHOT</version>
    </parent>

    <artifactId>hello-spring-security-oauth2-resource</artifactId>
    <url>http://www.funtl.com</url>

    <licenses>
        <license>
            <name>Apache 2.0</name>
            <url>https://www.apache.org/licenses/LICENSE-2.0.txt</url>
        </license>
    </licenses>


    <dependencies>
        <!-- Spring Boot -->
        <dependency>
            <groupId>org.springframework.boot</groupId>
            <artifactId>spring-boot-starter-web</artifactId>
        </dependency>
        <dependency>
            <groupId>org.springframework.boot</groupId>
            <artifactId>spring-boot-starter-test</artifactId>
        </dependency>

        <!-- Spring Security -->
        <dependency>
            <groupId>org.springframework.cloud</groupId>
            <artifactId>spring-cloud-starter-oauth2</artifactId>
        </dependency>

        <dependency>
            <groupId>tk.mybatis</groupId>
            <artifactId>mapper-spring-boot-starter</artifactId>
        </dependency>

        <dependency>
            <groupId>org.projectlombok</groupId>
            <artifactId>lombok</artifactId>
        </dependency>
    </dependencies>

    <build>
        <plugins>
            <plugin>
                <groupId>org.springframework.boot</groupId>
                <artifactId>spring-boot-maven-plugin</artifactId>
                <configuration>
                    <mainClass>ml.yompc.spring.security.oauth2.resource.Oath2ResourceApplication</mainClass>
                </configuration>
            </plugin>
        </plugins>
    </build>

</project>
关键步骤
#配置资源服务器
创建一个类继承 ResourceServerConfigurerAdapter 并添加相关注解:
@Configuration@EnableResourceServer:资源服务器@EnableGlobalMethodSecurity(prePostEnabled = true, securedEnabled = true, jsr250Enabled = true):全局方法拦截package ml.yompc.spring.security.oauth2.resource.configura; import org.springframework.context.annotation.Configuration; import org.springframework.security.config.annotation.method.configuration.EnableGlobalMethodSecurity; import org.springframework.security.config.annotation.web.builders.HttpSecurity; import org.springframework.security.config.http.SessionCreationPolicy; import org.springframework.security.oauth2.config.annotation.web.configuration.EnableResourceServer; import org.springframework.security.oauth2.config.annotation.web.configuration.ResourceServerConfigurerAdapter; /** * @email yom535@outlook.com * @author: 有民(yom535) * @date: 2019/8/22 * @time: 0:18 */ @Configuration @EnableResourceServer @EnableGlobalMethodSecurity(prePostEnabled = true,securedEnabled = true,jsr250Enabled = true) public class ResourceServerConfiguration extends ResourceServerConfigurerAdapter { @Override public void configure(HttpSecurity http) throws Exception { http .exceptionHandling() .and() .sessionManagement().sessionCreationPolicy(SessionCreationPolicy.STATELESS) .and() .authorizeRequests() // 以下为配置所需保护的资源路径及权限,需要与认证服务器配置的授权部分对应 .antMatchers("/").hasAuthority("SystemContent") .antMatchers("/view/**").hasAuthority("SystemContentView"); } }Application
package ml.yompc.spring.security.oauth2.resource; import org.springframework.boot.SpringApplication; import org.springframework.boot.autoconfigure.SpringBootApplication; import tk.mybatis.spring.annotation.MapperScan; /** * @email yom535@outlook.com * @author: 有民(yom535) * @date: 2019/8/22 * @time: 0:15 */ @SpringBootApplication @MapperScan(basePackages = "ml.yompc.spring.security.oauth2.resource.mapper") public class Oath2ResourceApplication { public static void main(String[] args) { SpringApplication.run(Oath2ResourceApplication.class,args); } }工具类
ResponseResultpackage ml.yompc.spring.security.oauth2.resource.dto; import lombok.Data; import java.io.Serializable; /** * @email yom535@outlook.com * @author: 有民(yom535) * @date: 2019/8/22 * @time: 0:47 */ @Data public class ResponseResult<T> implements Serializable { private static final long serialVersionUID = 3468352004150968551L; /** * 状态码 */ private Integer code; /** * 消息 */ private String message; /** * 返回对象 */ private T data; public ResponseResult() { super(); } public ResponseResult(Integer code) { super(); this.code = code; } public ResponseResult(Integer code, String message) { super(); this.code = code; this.message = message; } public ResponseResult(Integer code, Throwable throwable) { super(); this.code = code; this.message = throwable.getMessage(); } public ResponseResult(Integer code, T data) { super(); this.code = code; this.data = data; } public ResponseResult(Integer code, String message, T data) { super(); this.code = code; this.message = message; this.data = data; } public T getData() { return data; } public void setData(T data) { this.data = data; } @Override public int hashCode() { final int prime = 31; int result = 1; result = prime * result + ((data == null) ? 0 : data.hashCode()); result = prime * result + ((message == null) ? 0 : message.hashCode()); result = prime * result + ((code == null) ? 0 : code.hashCode()); return result; } @Override public boolean equals(Object obj) { if (this == obj) { return true; } if (obj == null) { return false; } if (getClass() != obj.getClass()) { return false; } ResponseResult<?> other = (ResponseResult<?>) obj; if (data == null) { if (other.data != null) { return false; } } else if (!data.equals(other.data)) { return false; } if (message == null) { if (other.message != null) { return false; } } else if (!message.equals(other.message)) { return false; } if (code == null) { if (other.code != null) { return false; } } else if (!code.equals(other.code)) { return false; } return true; } }application.ymlspring: application: name: oauth2-resource datasource: type: com.zaxxer.hikari.HikariDataSource driver-class-name: com.mysql.cj.jdbc.Driver url: jdbc:mysql://database-1.c0kagetmcysh.us-east-1.rds.amazonaws.com:3306/myshop?useUnicode=true&characterEncoding=utf-8&useSSL=false username: root password: 12345678 hikari: minimum-idle: 5 idle-timeout: 600000 maximum-pool-size: 10 auto-commit: true pool-name: MyHikariCP max-lifetime: 1800000 connection-timeout: 30000 connection-test-query: SELECT 1 security: oauth2: client: client-id: client client-secret: secret access-token-uri: http://localhost:8080/oauth/token user-authorization-uri: http://localhost:8080/oauth/authorize resource: token-info-uri: http://localhost:8080/oauth/check_token server: port: 8081 servlet: context-path: /contents mybatis: type-aliases-package: ml.yompc.spring.security.oauth2.resource.domain mapper-locations: classpath:mapper/*.xml logging: level: root: INFO org.springframework.web: INFO org.springframework.security: INFO org.springframework.security.oauth2: INFO在服务器端配置取消拦截地址
 @Override
    public void configure(WebSecurity web) throws Exception {
        web.ignoring().antMatchers("/oauth/check_token");
    }
完整
package ml.yompc.spring.security.oauth2.server.configure; import org.springframework.context.annotation.Bean; import org.springframework.context.annotation.Configuration; import org.springframework.security.config.annotation.authentication.builders.AuthenticationManagerBuilder; import org.springframework.security.config.annotation.method.configuration.EnableGlobalMethodSecurity; import org.springframework.security.config.annotation.web.builders.WebSecurity; import org.springframework.security.config.annotation.web.configuration.EnableWebSecurity; import org.springframework.security.config.annotation.web.configuration.WebSecurityConfigurerAdapter; import org.springframework.security.core.userdetails.UserDetailsService; import org.springframework.security.crypto.bcrypt.BCryptPasswordEncoder; /** * 认证 * @email yom535@outlook.com * @author: 有民(yom535) * @date: 2019/8/21 * @time: 15:41 */ @Configuration @EnableGlobalMethodSecurity(prePostEnabled = true,securedEnabled = true,jsr250Enabled = true) @EnableWebSecurity public class WebSecurityConfiguration extends WebSecurityConfigurerAdapter { @Bean public BCryptPasswordEncoder passwordEncoder(){ //加密 return new BCryptPasswordEncoder(); } @Override @Bean public UserDetailsService userDetailsService(){ return new UserDetailsServiceImpl(); } @Override public void configure(WebSecurity web) throws Exception { web.ignoring().antMatchers("/oauth/check_token"); } @Override protected void configure(AuthenticationManagerBuilder auth) throws Exception { auth.userDetailsService(userDetailsService()); } }访问资源
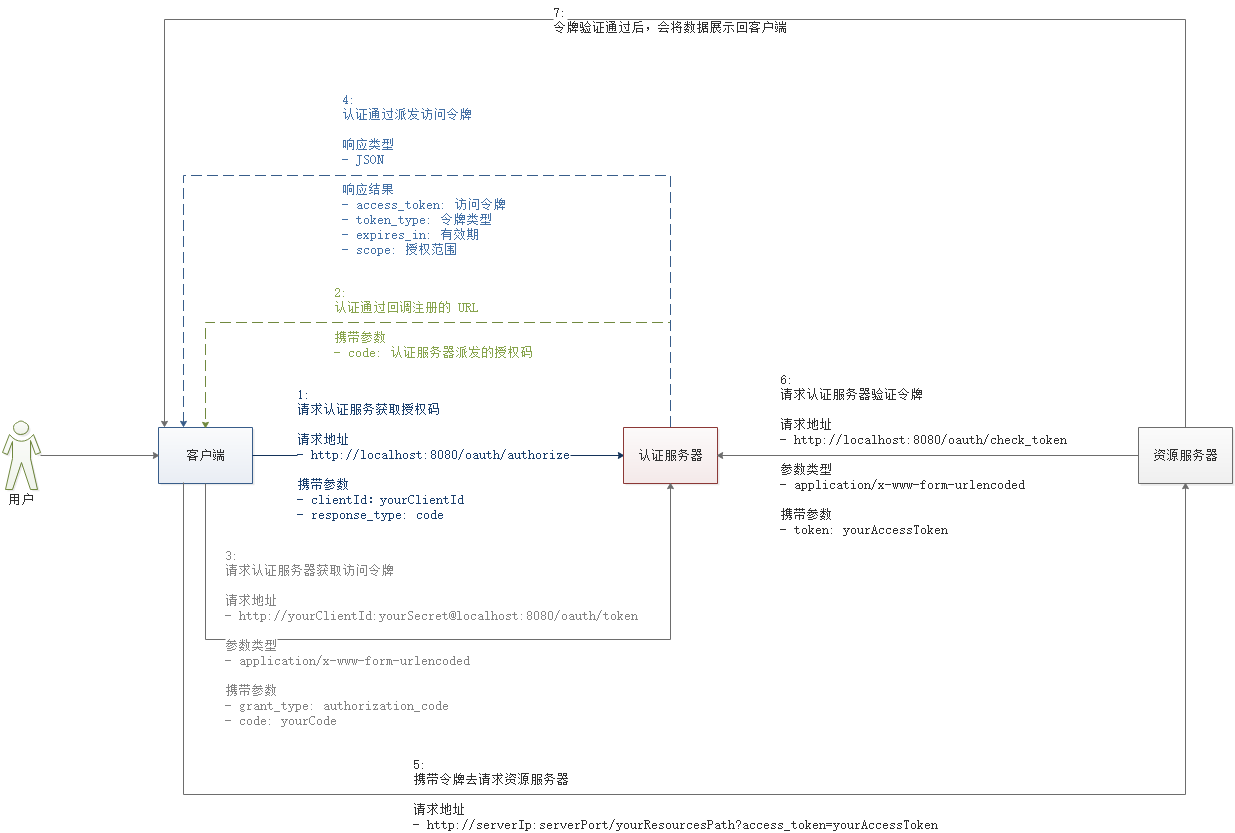
#访问获取授权码
打开浏览器,输入地址:
http://localhost:8080/oauth/authorize?client_id=client&response_type=code第一次访问会跳转到登录页面

验证成功后会询问用户是否授权客户端

选择授权后会跳转到我的博客,浏览器地址上还会包含一个授权码(
code=1JuO6V),浏览器地址栏会显示如下地址:http://www.yompc.ml/?code=1JuO6V有了这个授权码就可以获取访问令牌了
通过授权码向服务器申请令牌
通过 CURL 或是 Postman 请求
curl -X POST -H "Content-Type: application/x-www-form-urlencoded" -d 'grant_type=authorization_code&code=1JuO6V' "http://client:secret@localhost:8080/oauth/token"
得到响应结果如下:
{ "access_token": "016d8d4a-dd6e-4493-b590-5f072923c413", "token_type": "bearer", "expires_in": 43199, "scope": "app" }携带令牌访问资源服务器
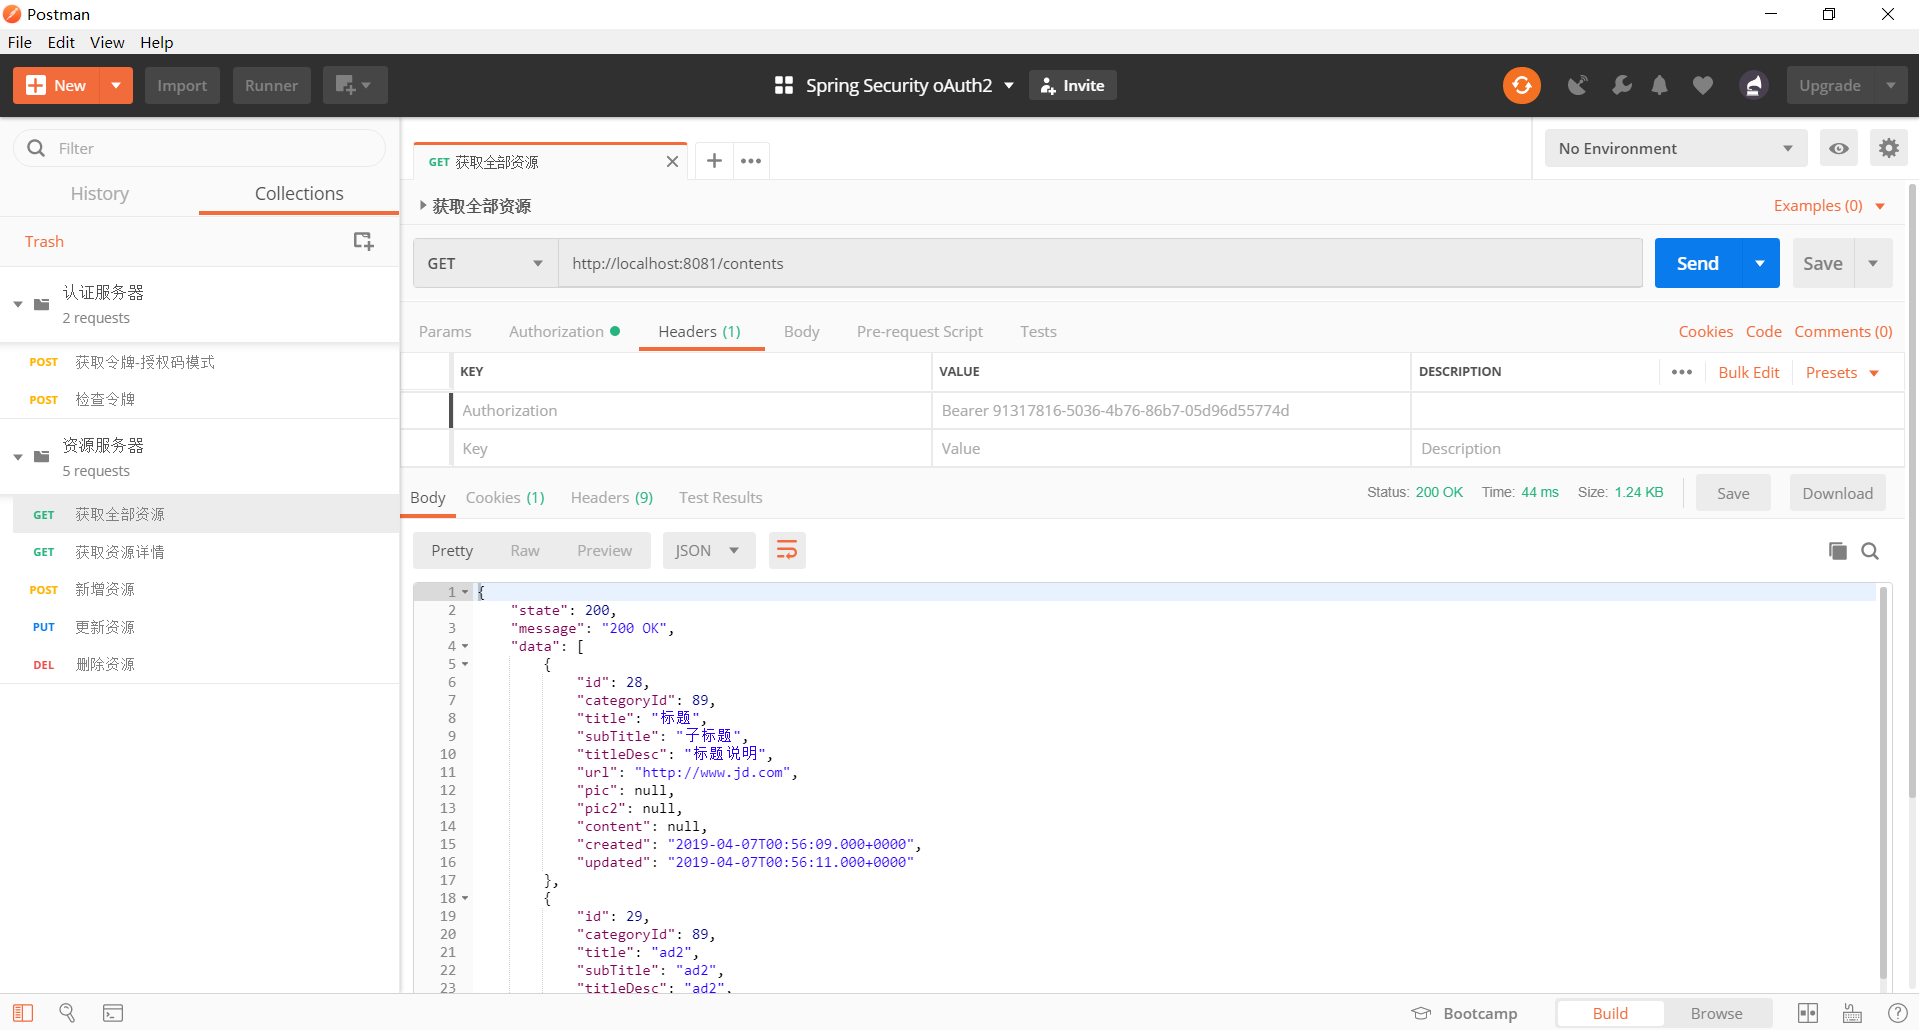
此处以获取全部资源为例,其它请求方式一样,可以参考我源码中的单元测试代码。可以使用以下方式请求:
- 使用 Headers 方式:需要在请求头增加
Authorization: Bearer yourAccessToken - 直接请求带参数方式:
http://localhost:8081/contents?access_token=yourAccessToken
使用 Headers 方式,通过 CURL 或是 Postman 请求
curl --location --request GET "http://localhost:8081/contents" --header "Content-Type: application/json" --header "Authorization: Bearer yourAccessToken"
- 使用 Headers 方式:需要在请求头增加
← RBAC 基于角色的权限控制 使用基础 →