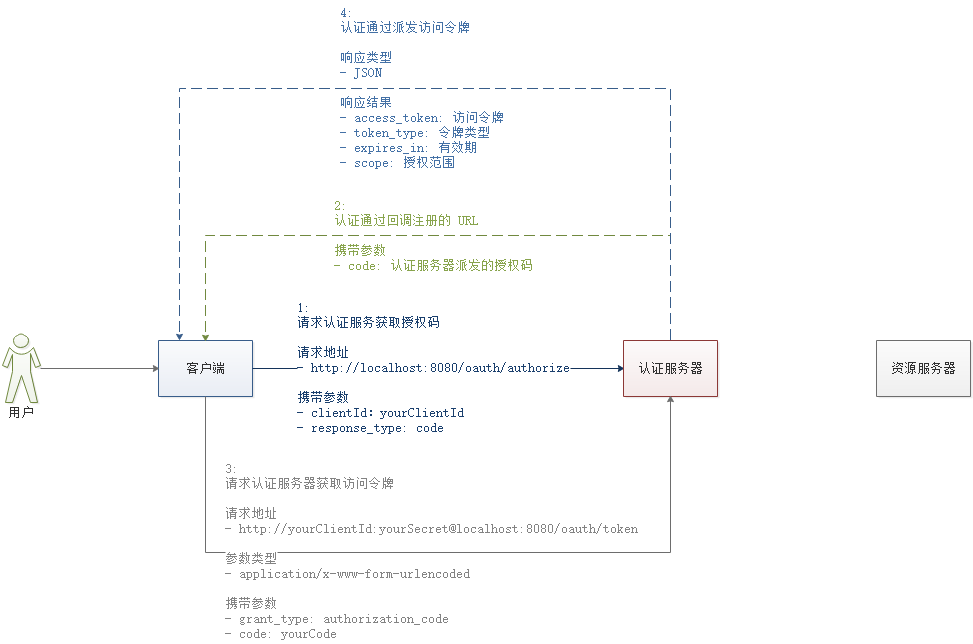
基于内存的存储令牌
#概述
本章节基于 内存存储令牌 的模式用于演示最基本的操作,帮助大家快速理解 oAuth2 认证服务器中 "认证"、"授权"、"访问令牌” 的基本概念
操作流程

配置认证服务器
配置客户端信息:
ClientDetailsServiceConfigurerinMemory:内存配置withClient:客户端标识secret:客户端安全码authorizedGrantTypes:客户端授权类型scopes:客户端授权范围redirectUris:注册回调地址
配置 Web 安全
通过 GET 请求访问认证服务器获取授权码
- 端点:
/oauth/authorize
- 端点:
通过 POST 请求利用授权码访问认证服务器获取令牌
- 端点:
/oauth/token
- 端点:
附:默认的端点 URL
/oauth/authorize:授权端点/oauth/token:令牌端点/oauth/confirm_access:用户确认授权提交端点/oauth/error:授权服务错误信息端点/oauth/check_token:用于资源服务访问的令牌解析端点/oauth/token_key:提供公有密匙的端点,如果你使用 JWT 令牌的话
#配置认证服务器
创建一个类继承 AuthorizationServerConfigurerAdapter 并添加相关注解:
@Configuration@EnableAuthorizationServer
package com.funtl.oauth2.server.config;

import org.springframework.context.annotation.Configuration;
import org.springframework.security.oauth2.config.annotation.configurers.ClientDetailsServiceConfigurer;
import org.springframework.security.oauth2.config.annotation.web.configuration.AuthorizationServerConfigurerAdapter;
import org.springframework.security.oauth2.config.annotation.web.configuration.EnableAuthorizationServer;

@Configuration
@EnableAuthorizationServer
public class AuthorizationServerConfiguration extends AuthorizationServerConfigurerAdapter {
    @Override
    public void configure(ClientDetailsServiceConfigurer clients) throws Exception {
        // 配置客户端
        clients
                // 使用内存设置
                .inMemory()
                // client_id
                .withClient("client")
                // client_secret
                .secret("secret")
                // 授权类型
                .authorizedGrantTypes("authorization_code")
                // 授权范围
                .scopes("app")
                // 注册回调地址
                .redirectUris("http://www.yompc.ml");
    }
}
#服务器安全配置
创建一个类继承 WebSecurityConfigurerAdapter 并添加相关注解:
@Configuration@EnableWebSecurity@EnableGlobalMethodSecurity(prePostEnabled = true, securedEnabled = true, jsr250Enabled = true):全局方法拦截
package ml.yompc.spring.security.oauth2.server.configure;

import org.springframework.context.annotation.Bean;
import org.springframework.context.annotation.Configuration;
import org.springframework.security.config.annotation.authentication.builders.AuthenticationManagerBuilder;
import org.springframework.security.config.annotation.method.configuration.EnableGlobalMethodSecurity;
import org.springframework.security.config.annotation.web.configuration.EnableWebSecurity;
import org.springframework.security.config.annotation.web.configuration.WebSecurityConfigurerAdapter;
import org.springframework.security.crypto.bcrypt.BCryptPasswordEncoder;

/**
 * 认证
 * @email yom535@outlook.com
 * @author: 有民(yom535)
 * @date: 2019/8/21
 * @time: 15:41
 */

@Configuration
@EnableGlobalMethodSecurity(prePostEnabled = true,securedEnabled = true,jsr250Enabled = true)
@EnableWebSecurity
public class WebSecurityConfiguration extends WebSecurityConfigurerAdapter {

    @Bean
    public BCryptPasswordEncoder passwordEncoder(){
        //加密
        return new BCryptPasswordEncoder();

    }

    @Override
    protected void configure(AuthenticationManagerBuilder auth) throws Exception {
                //内存模式
        auth.inMemoryAuthentication()
                //设置用户名和密码并且必须加密。也必须设置角色,角色规范要大写
                .withUser("user").password(passwordEncoder().encode("123456")).roles("USER")
                .and()//加用户
                .withUser("admin").password(passwordEncoder().encode("admin888")).roles("ADMIN");
    }
}
#application.yml
spring:
  application:
    name: oauth2-server


server:
  port: 8080
#访问获取授权码
打开浏览器,输入地址:
http://localhost:8080/oauth/authorize?client_id=client&response_type=code
第一次访问会跳转到登录页面

验证成功后会询问用户是否授权客户端

选择授权后会跳转到我的博客,浏览器地址上还会包含一个授权码(code=1JuO6V),浏览器地址栏会显示如下地址:
http://www.yompc.ml/?code=1JuO6V
有了这个授权码就可以获取访问令牌了
#通过授权码向服务器申请令牌
通过 CURL 或是 Postman 请求
curl -X POST -H "Content-Type: application/x-www-form-urlencoded" -d 'grant_type=authorization_code&code=1JuO6V' "http://client:secret@localhost:8080/oauth/token"
1

← 创建认证服务器 基于 JDBC 存储令牌 →